(An apology. I copied and pasted the script for the CSS into this post a little further down. Once I did that, the formatting for my regular typing went wonky. Words got chopped up and there are random, huge blank spaces. And for the life of me, I can't figure out how to fix it.)
I have been irritated with Blogger that I couldn't do a background with my own picture (or Livie's picture. It is on my camera, but I think she may have taken it.), but knew there was some computer minded way in which I could.
Probably anyone who wants to know this stuff already does (I mean this is the age of google) but in case you don't, I am going to run through the steps. I googled it to find it out, but I couldn't find it out all in one go. I had to google several different things. Even though the tutorials I came across said they were uncomplicated and anyone could do it. Apparently I am not as smart as the anyone they were thinking of when they wrote it. Because a lot of it was gobble-tee-gock. "Put in a color code." WHAT IS A COLOR CODE?
So I am going to write this tutorial dumbed down for my liking. In case I want to do this later and forget how to.
First off, you need to to to your blogger dashboard and click on the options tab. That is the one with the little paper thing in between your write a new blog post button and the view your blog button.

A little drop down menu appears and you then click Template.

Click on Customize under the mini picture of your blog.

This takes you to a new page where over to the top left, you will see an Advanced tab. Clicking on this opens options to the right of that.

If you scroll down, Add CSS is at the bottom. Click on that and a large white box appears to the left.

Into this nice white box, you copy and past this script
body {background: ColorCode url(YourImageUrl) no-repeat center fixed;}.body-fauxcolumns .fauxcolumn-outer div, .body-fauxcolumn-outer .cap-top .cap-left {background:none;}
Now the things that you can change, or rather, that I understand how to change I will underline and make bold
body {background: ColorCode url(YourImageUrl) no-repeat center fixed;}.body-fauxcolumns .fauxcolumn-outer div, .body-fauxcolumn-outer .cap-top .cap-left {background:none;}
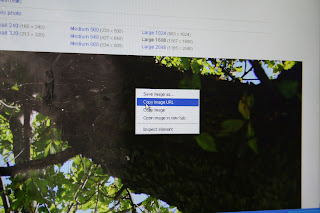
Colorcode--this is so you can change the background color that would appear on either side of your picture or above or below it. Here is a link to a page that has a lot of different colors on it.http://www.quackit.com/css/css_color_codes.cfm Scroll down to X11 colors. Type the name of the color you want into the line of script, erasing the word "colorcode." Make sure you do not put a space between words, such as cornsilk or darkseagreen. Just throw various colors in there for fun.YourImageUrl--This is where you put the url of your image. This requires that you upload pictures to an online photo storage site like Picasa or Flickr or something. I used Flickr, so that is what I will talk about. Upload the regular picture. Once it is uploaded, click on it in your "photostream". To find the url, click on Actions, which will drop down a menu.
Click on view all sizes, which will bring up a screen like this. To fill the entire screen, I choose Large 1600 size.
Center means it will start in the center and tile around it for a repeat. Change this to left or right if you want different parts of your picture to show up in different spots.Fixed means the background of your blog will be the same as you scroll. Your image will look the same no matter how far down you scroll. You can change this to scroll, but for me, it just made it so the picture was there when you opened the blog and stayed at the top. So leave this as Fixed if you want your background to be the same throughout.At the end, you should have a code that looks like body{background: slategrey url(http://farm9.staticflickr.com/839/7979285634_4f4cfa93e6_h.jpg) no-repeat center fixed;}.body-fauxcolumns .fauxcolumn-outer div, .body-fauxcolumn-outer .cap-top .cap-left {background:none;}
And I just deleted a number there in the url, just so no one is allowed to steal my blog picture. But that is the basic gist.
This is a big picture, so doing it like this might make it hard for people using a slower internet connection to load your blog. Something to consider. If you are worried about that, you can change the pixel size or resolution of your picture through your picture editing software. And just go ahead and google how to do that if you don't know because I still struggle with trying to figure that out. I know you can use the basic Windows paint to do it though. Because that is how I do it.
And there we are. A personal picture background. I feel so much better about myself now! Now I will go look at my messy house to temper my pride at having figured out something that I should have or could have figured out ages ago.
1 comment:
This will be very helpful! I could have never gotten that on my own!
Post a Comment